I’m using AG Grid in one of my Angular projects. It is a powerful data grid component that provides dozens of built-in developer-friendly features such as filters, sorting, and pagination for handling large amounts of data. However, some of the features, such as the context menu, are only available in the Enterprise version, and the pricing of the Enterprise version is more expensive. So I decided to create a custom context menu.
0. Prerequisites
This article assumes you have been created an AG Grid in a webpage.
1. Create a Context Menu Component
Create a context menu component with the ng kit or do it manually by yourself.
$ ng generate component
? What name would you like to use for the component? result-list-context
CREATE src/app/result-list-context/result-list-context.component.css (0 bytes)
CREATE src/app/result-list-context/result-list-context.component.html (34 bytes)
CREATE src/app/result-list-context/result-list-context.component.spec.ts (705 bytes)
CREATE src/app/result-list-context/result-list-context.component.ts (325 bytes)
UPDATE src/app/app.module.ts (444 bytes)
Then open src/app/result-list-context/result-list-context.component.* and write codes for the context menu component.
<div class="context-menu" tabindex="-1" aria-hidden="true">
  <ul *ngIf="isDisplayMenu">
    <li *ngFor="let menuItem of menuItems"
        (click)="onMenuClick(menuItem.action)">{{ menuItem.title }}</li>
  </ul>
</div>
.context-menu {
  display: block;
  position: absolute;
  user-select: none;
}

.context-menu ul {
  list-style: none;
  padding: 4px 10px;
  width: 12rem;
  height: auto;
  color: black;
  background: #f8f8f8;
  border: 1px solid gray;
  box-shadow: 0 1px 4px 1px rgb(186 191 199 / 40%);
}

.context-menu ul li {
  padding: 0;
  margin: 0;
  line-height: 24px;
  font-size: 14px;
}

.context-menu ul li:hover {
  background: rgba(33,150,243,0.1);
}
import {Component, ElementRef, HostListener, Input, OnInit} from '@angular/core';

@Component({
  selector: 'app-result-list-context',
  templateUrl: './result-list-context.component.html',
  styleUrls: ['./result-list-context.component.css']
})
export class ResultListContextComponent implements OnInit {
  @Input() menuEvent: any;
  @Input() menuSelector: any;
  @Input() menuItems: any;
  @Input() gridApi: any;

  isDisplayMenu = false;
  currentMenu:any = null;

  constructor(private elementRef: ElementRef) {
    this.isDisplayMenu = false;
  }

  ngOnInit() {
    this.createMenu(this.menuEvent.clientX, this.menuEvent.clientY);
    this.menuSelector!.addEventListener('click', () => {
      if (this.currentMenu !== null) {
        this.currentMenu = null;
      }
    });
  }

  createMenu(x: string, y: string) {
    this.isDisplayMenu = true;
    if (this.elementRef.nativeElement) {
      this.currentMenu = this.elementRef.nativeElement.querySelector('.context-menu');
      this.currentMenu!.style.left = x + "px";
      this.currentMenu!.style.top = y + "px";
    }
  }

  closeMenu() {
    this.currentMenu = null;
  }

  @HostListener('document:click')
  documentClick(): void {
    this.isDisplayMenu = false;
  }

  @HostListener('window:onkeyup')
  escKeyClick(): void {
    this.isDisplayMenu = false;
  }

  onMenuClick(action: string) {
    console.log(action);
  }
}
2. Register Callbacks and Create a Context Menu Container
To create a context menu when the user clicks the right mouse button, you may need a callback for the cellContextMenu Event. Do not forget to register oncontextmenu to return false; to prevent the default context menu of the browser.
<ag-grid-angular
  ...
  (cellContextMenu)="onCellContextMenu($event)"
  oncontextmenu="return false;"
>
</ag-grid-angular>
Then, create a container for display the context menu:
<div #contextMenuContainer></div>
Complete the code to show the menu:
import {Component, ComponentFactory,
  ComponentFactoryResolver,
  OnInit,
  ViewChild,
  ViewContainerRef
  ...
} from '@angular/core';
import {ResultListContextComponent} from '../result-list-context/result-list-context.component';
...

  @ViewChild('contextMenuContainer', {read: ViewContainerRef, static: true})
  container!: { clear: () => void; createComponent: (arg0: ComponentFactory<ResultListContextComponent>) => any; };

  constructor(private componentFactoryResolver: ComponentFactoryResolver, private http: HttpClient) { }

  onCellContextMenu = (event: CellContextMenuEvent) => {
    this.container.clear();
    const componentFactory = this.componentFactoryResolver.resolveComponentFactory(ResultListContextComponent);
    let component = this.container.createComponent(componentFactory);
    (<ResultListContextComponent>component.instance).menuEvent = event.event;
    (<ResultListContextComponent>component.instance).menuSelector = event.event!.target;
    (<ResultListContextComponent>component.instance).menuItems = [
      {
        title: 'Copy',
        action: 'copy'
      }
    ];
    (<ResultListContextComponent>component.instance).gridApi=this.gridApi;
  }
...
}
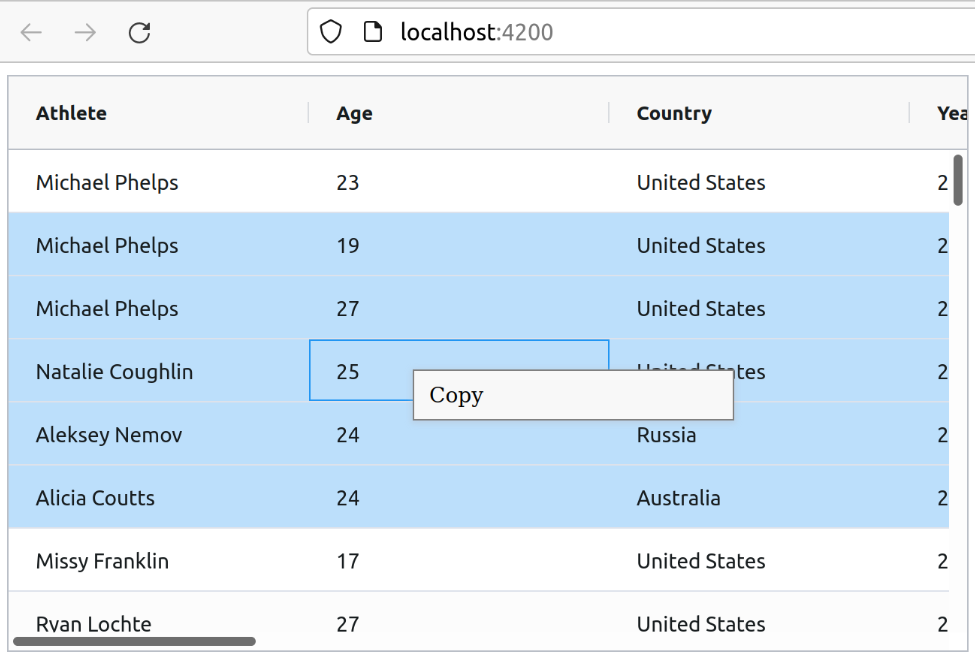
Now right-click on your data grid, the context menu should be shown. However, the item which you clicked would not be auto-selected.

You may use the grid API to solve this problem.
<ag-grid-angular
  ...
  (gridReady)="onGridReady($event)"
>
</ag-grid-angular>
3. Complete the Copy Feature
Finally, return to src/app/result-list-context/result-list-context.component.ts to complete the copy feature. I use the clipboard module from Angular CDK for instance in the article.
...
import {Clipboard} from '@angular/cdk/clipboard';
export class ResultListContextComponent implements OnInit {
...
constructor(private elementRef: ElementRef, private clipboard: Clipboard) {
...
}
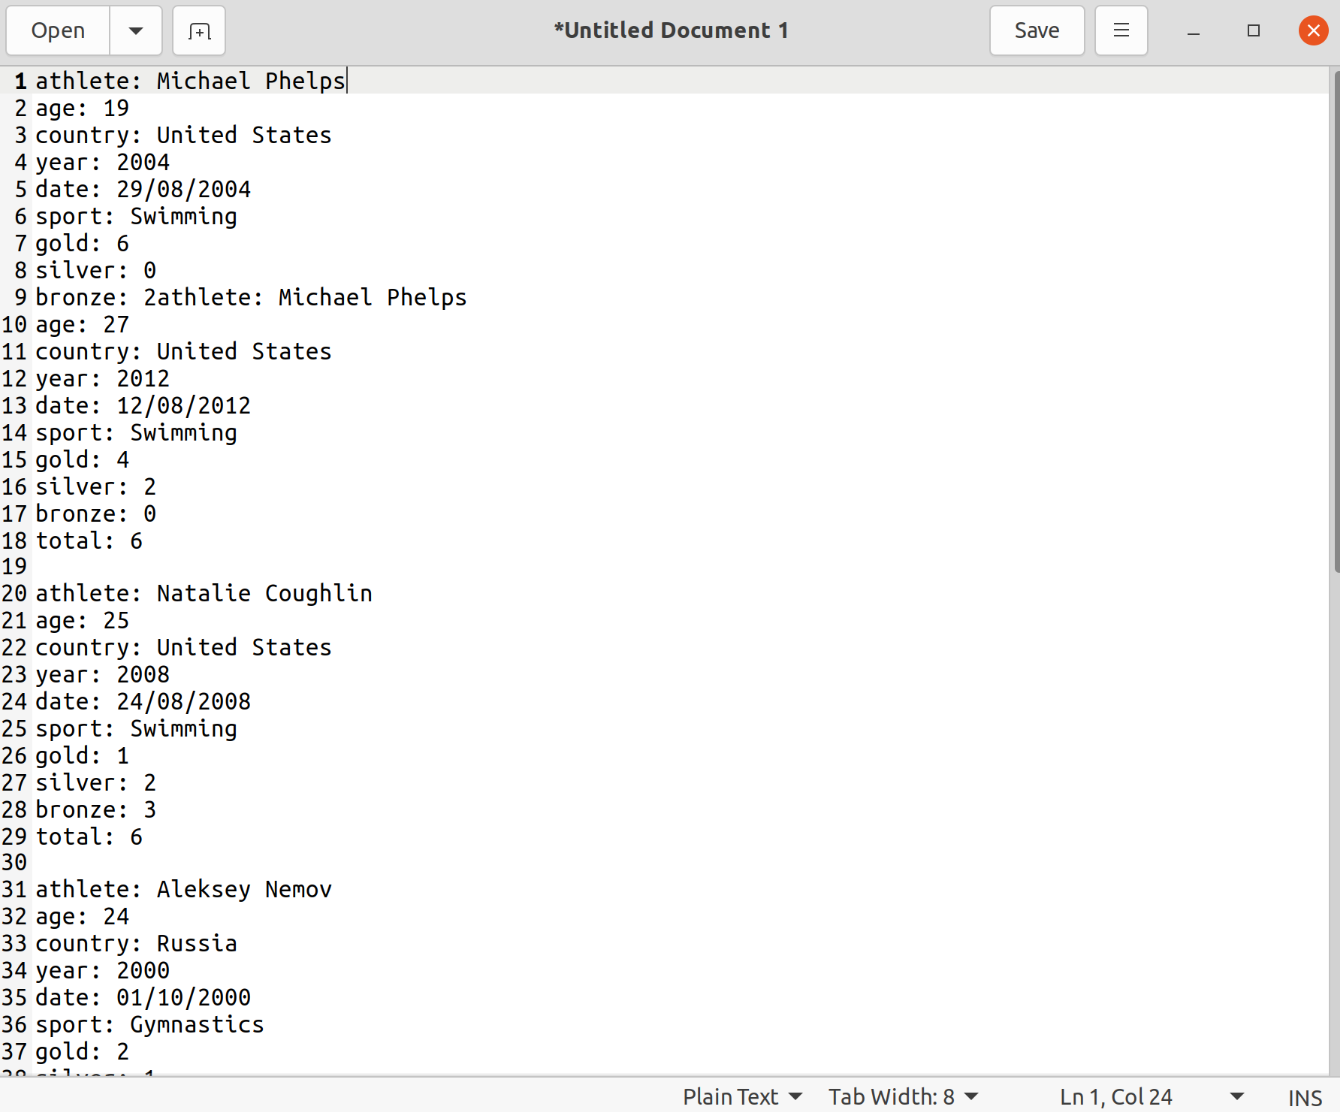
onMenuClick(action: string) {
switch (action) {
case "copy":
let text = "";
this.gridApi.getSelectedNodes().forEach((node: any) => {
Object.entries(node.data).forEach(entry => {
const [key, value] = entry;
text += `${key}: ${value}\n`;
});
text += "\n";
})
this.copyText(text.trim());
break;
default:
break;
}
}
copyText(text: string) {
const pending = this.clipboard.beginCopy(text);
let remainingAttempts = 3;
const attempt = () => {
const result = pending.copy();
if (!result && --remainingAttempts) {
setTimeout(attempt);
} else {
pending.destroy();
}
};
attempt();
}
}
The copyText function comes from Angular CDK Docs .
Now, the copy features should work.
-1. More Resources
The completed example project is on GitHub .